|
Autodesk® Architectural Desktop 3.3 provides a way to design and
document stairs that is flexible enough to accommodate practically any
design and yet requires very little time on your part.
Consider the
following scenario: You've just designed a concrete stair, yet its edges
do not conform to the shape of the walls that make up the stairwell.

Figure 1: The edges of the stairs do not match.
Rather than
erasing and redrawing the stair, you can take advantage of a great
design tool known as Customize Edge.
The Concept in
a Nutshell
A stair's edge can be customized by a number of means, including
projecting it to walls, or even polylines. In this example, an outline
was drawn using the polyline command (see the red polyline shown in
Figure 2) to reflect the desired new edge of the stair.

Figure 2: Draw a polyline that will serve as a guide for the stair
Highlight the
stair and right-click to access the stair option known as Customize Edge
(see Figure 3).

Figure 3: Right-click to access Customize Edge.
After you've
selected Customize Edge, you must specify how you'd like the edge to be
customized. In this example, the stairs will be customized by adhering
to the red polyline that was drawn earlier (see Figure 4).

Figure 4: Select the edge to be projected.
Now, simply select
the edge that you'd like to customize and the polyline that you want to
use as the basis for the customization. Autodesk Architectural Desktop
will then project the edge of the stair to the polyline. You see the
result in Figure 5.

Figure 5: The stair with customized edge
But we're not
done. The stair looks correct in 3D View, but now we have to "turn off"
all of the stair components in the down direction such as stringers,
risers, and nosing so that it is displayed properly in Plan View as
well.
We can do this
easily by changing the stair's Entity Display. To do this, select the
stair, right-click, and choose Entity Display, which opens the Entity
Display dialog box. Then click on the Display Props tab in the Entity
Display dialog box. You should see the following options known as
Overrides:
In essence, these
Overrides give you a great deal of flexibility to alter the appearance
of objects many different levels. Here's a brief explanation of the
Overrides and their respective effects:
- Stair -
The change will only be reflected in the specific stair selected. Use
this option if you want to turn off the stair components in the down
direction (stringers, risers and nosing) for this stair and this stair
only.
- Style -
The change will be reflected in every object of that specific style.
Use this option if you want to turn off the stair components in the
down direction (stringers, risers and nosing) for every stair of
this specific style. If Style is chosen as the Override, every
stair whose style is Concrete will no longer display its "down
components."
- System -
The change will be reflected in every object of the specified type. If
System is chosen as the Override, every stair, regardless of style,
will no longer display its components (such as stringers, risers and
nosing).

Figure 6: Use Entity Display to change the Plan View of the stair
Since we only want
to change the appearance of this specific stair, in the Display Props
tab of the Entity Display dialog box, let's choose Stair and click on
the Edit Display Props button. This opens the Entity Properties dialog
box.
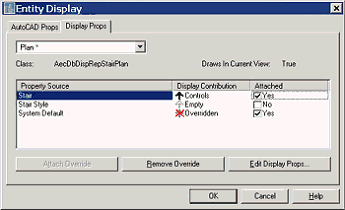
Figure 7: Apply the Override to this specific stair's Plan View.
Select the
Layer/Color/Linetype tab of the Entity Properties dialog box to access
all of the components that comprise the stair. As you can see this stair
is comprised of the following components:
- Stringer Up
- Riser Up
- Nosing Up
- Path Up
- Outline Up
- Stringer Down
- Riser Down
- Nosing Down
- Path Down
- Outline Down
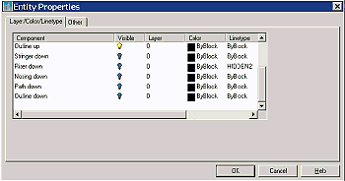
Figure 8: Turn off the visibility of all the components of the stair.
Turn off the
visibility of all of the components by selecting the bulb on the Visible
column, and select OK.
|
Note:
Besides turning off the visibility of specific components, you can
also use Entity Display to change the color, linetype, and
lineweight of specific components.
|
It's as easy as
that. Now you have designed a stair that displays itself correctly not
only in Plan, but in its 3D View as well. This will come in handy when
the time comes to extract sections and elevations from your model.

Figure 9: Accurate stair in both Plan View and 3D View.
|