The following
anonymous question was taken from the autodesk.autocad.2002general
newsgroup:
When I'm in the XREF edit mode, how do I make an object in the
current drawing (all objects are shaded) appear in the XREF drawing? I
can select the objects in the current drawing, but I need those
objects to be saved to the external referenced drawing. How do I do
this?
Xrefs are external
drawing files that are attached to the current file. They are frequently
used as backgrounds over which you can add additional information. For
example, suppose you want to add a furniture layout to a floor plan, but
you want to keep the layout as a separate file from the floor plan. Just
create a new furniture layout file, and then use the AutoCADŽ Xref
feature to attach the floor plan to the layout file.
The floor plan
appears in the furniture layout file and you can begin to add the
furniture. Once you save the layout file, AutoCAD software "remembers"
that you attached the floor plan to it as an xref. So the next time you
open the furniture file, you see the floor plan as a background just as
you had left it in the previous editing session. If in the interim the
floor plan file has changed, you'll see those changes in the xref of the
floor plan the next time you open the furniture layout.
By using xrefs in
this way, you can organize your drawings into meaningful groups and
reduce file sizes. Xrefs also let you divide work among a group of
people. In a large project, for example, several people can work on the
furniture layout using the floor plan file as an xref. Since everyone is
using the same floor plan as a background, you ensure design
consistency.
Editing Xrefs
When a drawing is used as an xref, the xref behaves as a single object.
The entire xref can be scaled, moved, or mirrored, but the objects that
make up the xref are not directly accessible.
What do you do
when you want to make changes to the xref while editing the current
drawing? You may spot an error in the xref, for example, and want to
make corrections then and there. Or you may want to transfer an object
from the current drawing to the xref, as the person asking this month's
question wants to do.
In these
situations, use the REFEDIT command in AutoCAD. With REFEDIT you can
edit individual objects within an xref. (REFEDIT also works on AutoCAD
blocks.) You begin by invoking the REFEDIT command which places you in
what I'll call the Refedit mode. While in this mode, you are able
to access and edit objects in an Xref. When you're finished making
changes to your Xref, you exit the Refedit mode and your changes are
saved to the Xref file. Here's how to use REFEDIT to make changes to an
Xref from the current drawing:
1. Open a drawing
file containing an xref and then choose Modify > In-place Xref and Block
Edit > Edit Reference. You can also enter Refedit at the command
prompt.
2. Select the xref
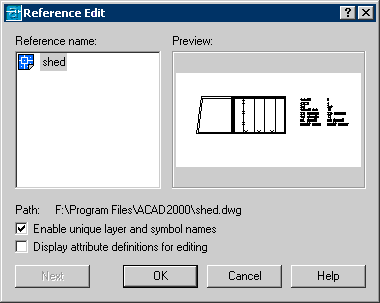
you want to edit. The Reference Edit dialog box opens (see Figure 1).

Figure 1: The Reference Edit dialog box.
3. Click OK. The
dialog box closes and you are prompted to Select Nested Object.
4. Select the
object or set of objects in the xref that you want to edit and press the
Enter key. All of the xref objects, except the ones you selected, are
shaded and become unavailable, and the Refedit toolbar appears (see
Figure 2).

Figure 2: The Refedit toolbar.
The objects you
select in Step 4 become part of what is called the working set of
objects. Once the Refedit toolbar appears, you are in the Refedit mode
and you can edit or delete xref objects in the working set.
Understanding
REFEDIT and the Working Set
You might think of the Refedit mode as a mode where you have temporarily
suspended the editing session of your current drawing to focus solely on
the Xref. The working set is the set of objects that you have
temporarily extracted from the Xref in order to edit them. While in the
Refedit mode, you can begin to make changes to the objects in the
working set. You may also add objects to or delete objects from this
working set. Any new objects you create also become part of the current
working set of objects. You may also move or copy objects from the
current drawing to the working set. Once you have completed your changes
to the working set, you can exit the Refedit mode and all of the
contents of the working set are saved back to the Xref. Or, if you
decide that you don't want to save your changes, you can exit the
Refedit mode and discard your changes.
Now, to answer the
original question, let's continue exploring the REFEDIT command by
moving existing objects from the current drawing to the working set.
1. Click the Add
Objects to Working Set tool on the Refedit toolbar (see Figure 3). Or
you can choose Modify > In-place Xref and Block Edit > Add to Working
Set.

Figure 3: The Add Objects to Working Set tool.
2. At the Select
Object prompt, select the objects in the current drawing that you want
to move to the xref. The selected objects are no longer shaded, which
means you can now edit them.
Remember that
objects in the current working set are considered part of the xref, so
when you add objects to the working set, you are essentially queuing up
objects to be added to the xref.
|
Note: To
remove objects from the working set, use the Remove Objects from
Working Set tool in the Refedit toolbar, or choose Modify >
In-place Xref and Block Edit > Remove from Working Set. Removing
objects from the working set is like transferring objects from the
xref to the current drawing. To copy objects from the current
drawing to the xref, first add the objects to the working set,
make copies of them, then remove the original objects from the
working set. That way, the original objects remain in the current
drawing while the copies are moved to the xref.
|
When you are
finished editing, save your changes back to the xref file. Here's how:
1. Click the Save
Back Changes to Reference tool on the Refedit toolbar (see Figure 4). Or
you can choose Modify > In-place Xref and Block Edit > Save Reference
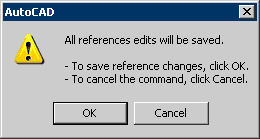
Edits. A prompt appears asking you if you want to save your changes to
the xref (see Figure 5).

Figure 4: The Save Back Changes to Reference tool.

Figure 5: The prompt asking you if you want to save changes to the
external reference.
2. Click OK. The
xref file is updated with the changes you have made to the current
working set of objects, including any new objects you have created.
Once you have
saved your xref changes, you exit the Refedit mode and return to the
standard mode of editing in AutoCAD software. If for some reason you
decide to discard the changes you've made to the xref working set, use
the Discard Changes to Reference tool (see Figure 6). You may also
choose Modify > In-place Xref and Block Edit > Discard Reference Edits.

Figure 6: The Discard Changes to Reference tool.
Conclusion
Xrefs are an excellent tool for organizing your work, but they can be a
bit cumbersome to work with. The REFEDIT command provides an easier way
to work with xrefs by offering a kind of gateway to them from the
current drawing. REFEDIT may not be the most intuitive command, but once
you get used to it, you'll find it indispensable. And don't forget that
REFEDIT also works on blocks. With REFEDIT, you can modify a block
without having to explode and redefine it. So if you are not familiar
with REFEDIT, give it a try!
|


