|
Join me in
this short tutorial lesson to create a wall style with a typical
batt insulation. When we finish, you'll be able to create your
own custom wall styles as well as add a Center linetype to any
of your new or existing wall styles.
1. Start a
new drawing using the Aec arch (Imperial).dwt template.
- From
the File pull-down menu, select New.
- Select
the Use a Template Toolbar button.
- Select
the Aec arch (Imperial).dwt Template and then choose OK.
2. First
load the Batt Linetype into the current drawing.
- From
the Format pull-down menu , select Linetype.
- Select
the Load dialog button.
- Scroll
down and select the Linetype named Batting, then choose OK.
3. Turn
off paper space linetype scaling and change the global scale
factor.
- If the
Linetype Manager dialog box does not show details, select
the "Show details" dialog button.
- Turn
off the "Use paper space units for scaling" check
box.
- Double-click
in the "Global scale factor:" edit box. Change the
value to 36, and then choose OK.
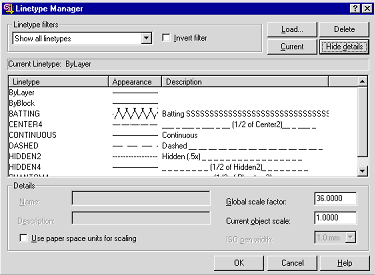
The Linetype Manager dialog box
4. To
create the new wall style, go to the Wall Styles dialog box.
Select the pull-down menu Design>Walls>Wall Styles.
5. Create
the new wall style name.
- Select
the New Dialog button.
- Type in
BattWall_08 for the wall style name and then choose OK.
6. Edit
the description and create the Components for the new wall
style.
- With
the new BattWall_08 wall style selected, choose the Edit
dialog button.
- Click
in the Description Field and type 8" Wall Style with
Batt Insulation.
- Select
the Components tab to create the Wall Components.
- Double-click
in the Name edit box for component 1 and change to Wall.
- Double-click
in the Priority edit box and change the value to 40.
- Select
the Edge Offset dialog button and make sure that the Base
Value is currently 0, and then turn Off the Use Base Width
check box and then choose OK.
- Select
the Width dialog button and change the Base Value to 8. Then
turn off the "Use Base Width" check box and choose
OK.
- Select
the Add dialog button to create the next wall component.
- Double-click
in the Name edit box for component 2 and change to Batt
Insulation.
- Double-click
in the Priority edit box for component 2 and change the
value to 30.
- Select
the Edge Offset dialog button and change the Base Value to
4. Then turn off the "Use Base Width" check box
and choose OK.
- Select
the Width dialog button and change the Base Value to 0. Then
turn off the" Use Base Width" check box and choose
OK.
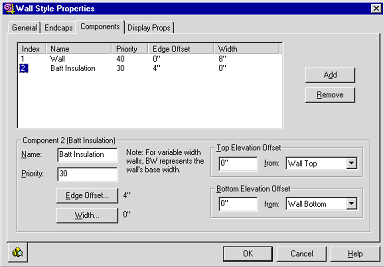
Wall Style Properties - Components
7. Edit
the Display Props for the Wall Components.
- Select
the Display Props tab to edit the Display Props for the Wall
Style.
- Plan*
should be the current Display Representation. Select the
Wall Style Property Source and select the Attach Override
dialog button to make the modifications specific to this
wall style.
- Select
the Edit Display Props dialog button to show the components
of the wall style.
- Select
the Bylayer Linetype for the Boundary 2 (Batt Insulation)
and select the Batting Linetype. Choose OK.
- Select
the Lt Scale for Boundary 2 (Batt Insulation) and change it
to .25. Choose OK.
- Continue
to select OK to exit all Wall Styles dialog boxes.
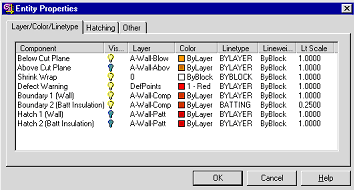
Entity Properties
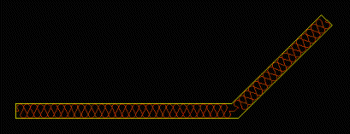
8. That's
it. Now try it out!
- Select
the pull-down menu Design>Walls>Add Wall.
- Scroll
to the BattWall_08 Wall Style and click in your drawing area
to start drawing with the new wall style.
- Try
copying the new wall style to another name and change the
values of component 2 to a Center linetype to have a wall
style that displays a centerline. Summary Creating custom
wall styles with AutoCAD Architectural Desktop™ software
is easier than you might think, and a powerful tool to have
at your disposal.
|